I spend quite a lot of time each week on digitizing or tinkering with the website, but I also like to work on other crafts and projects. This page showcases mostly things I've been working on, though I do sometimes feature items made by my sisters. Most are embroidery-related, but some show other crafts and activities as well. Many of the items, though not all, are gift items for friends and siblings, mainly for Christmas, the biggest gift-giving time of the year in my family.
If any of these project ideas interest you, please let me know and I'll post some detailed instructions.
Small Door Banner
Posted 2018 Dec 28
A small banner just the right size (about 8x14") to hang on an entry door makes a great gift. I've made several of these as gifts for friends and family, many of them by request. I generally use an extra large size design (7" tall) for a banner like this.
Click here to see more examples.
Merry Christmas Bunting
Posted 2018 Dec 21
In recent years I've gone a little crazy with Christmas decorating, and this year I was inspired by a vintage Merry Christmas bunting that I saw at someone else's place. It was made with letters cut from felt and strung on a cord, so I thought I might be able to do something similar on the embroidery machine.
I started with the playful letter outlines and filled in the interiors with a variety of Christmas-themed mini designs. Click here to see the complete instructions. The whole effect is cheerful and fun -- just right for a Christmas entryway. The original had sequins stitched on and I toyed with the idea of adding them to my machine-embroidered letters but I decided once it was all assembled that I didn't really need them. I must say I'm thrilled with the way the Christmas minis stitched out. You can find them all here, and the bunting letter set here.
Simple Drawstring Gift Bags
Posted 2018 Dec 14
DH hates Christmas wrapping, and as a result he tends to put it off til the absolute last minute -- which for years meant that we didn't get to spend much time together on Christmas Eve, because he was busy fretting and fuming over the chore of wrapping my gifts.
I solved the problem by making lots of these drawstring fabric bags. Hubby loves them, especially for oddly-shaped gifts that he otherwise finds challenging to wrap. All he has to do is pop the gift inside and pull the cords, and he's done.
You can make simple ones in a few minutes and leave them plain to show off pretty fabric, or decorate them with an embroidered motif before you finish stitching up the sides. I make them in a variety of sizes for gifts large and small.
I've embroidered directly on the fabric of the bag, as on the blue plaid one at left in the picture, but I find the embroidery shows up better if I stitch it on a plain color patch appliqued to the front of the bag.
If you're adding the embroidery while the bag is under construction, you can complete the entire process right in the embroidery machine. Hoop the main fabric, then float a piece of plain fabric and embroider the motif through both. Finish with one of the borders in your machine, then trim around the patch with pinking shears, leaving a border of about 1/4".
I have tried a variety of fabrics for the applique, including some left over bits of satin, but I find that cotton flannelette or plain felt works best.
I've also been able to attach an embroidered patch to an existing bag without opening up the side seams. I simply trim around the design stitch-out with pinking shears, then place and pin it to the front of the finished bag. Turn the bag inside out and carefully insert it under the presser foot of a conventional sewing machine. Gently pull the excess fabric out of the way of the needle, and use one of the fancy stitch settings to sew the patch to the bag.
We wrap everything at our house, including stocking stuffers, so these bags have saved a lot of time and stress over the holidays -- and DH doesn't dread wrapping so much anymore.
Coordinated Fabric-Embroidery Stockings
Posted 2018 Dec 07
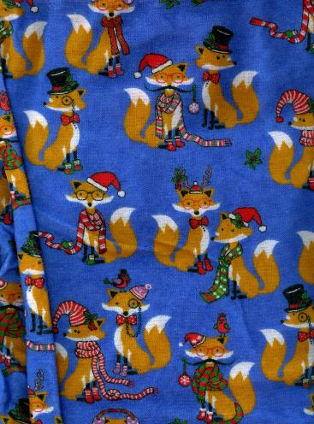
I made stockings from this Christmas fox fabric as a surprise for Louise and Hector -- and added an embroidered design based on the images on the fabric. I just love how the fabric and the design coordinate.
To see a PDF of the finished stockings, click here. For a template and details of how I make my fully lined stockings, click here.
Custom Underwear for the Guys
Posted 2018 Nov 30
It's difficult to find things to sew and embroider for men, but I discovered that my guys love their homemade underwear!
Click here to see a few samples and the pattern I use.
Customized Santa Hat
Posted 2018 Nov 23
We wear Santa hats for our Christmas Day festivities, so I generally keep a few on hand. I like to add something extra to the purchased hats to make them uniquely our own.
To make this one special, I added some embroidery in the form of appliqued holly leaves with red jingle bell berries. I made the leaves freestanding by appliqueing the green tartan fabric to two layers of green felt sandwiched over the hooped stabilizer. Then I attached them to the hat by stitching down the center line of each leaf with invisible thread. The jingle bells were stitched on afterward by hand.
Mini Stocking Ornaments
Posted 2018 Nov 16
Mini Stockings make a great friendship or hostess gift, and are quick to make up. There are just so many ways to personalize them, and you can add any one of more than two dozen mini toys.
The girls at Fredie's Fish & Chips, where my sister goes often, just loved their personalized mini-stocking ornaments, complete with lighthouse motif and Tiny Fish toys.
Here I made the little fishies in two different colors, and they look great in these seaside-themed mini stockings. Find the ornaments and the free fishie here.
Kaleidoscopic Cats Ornaments
Posted 2018 Nov 9
They're not embroidered, but these custom ornaments are a great way to showcase a favorite photo or image, and the repeating motif makes a kind of kaleidoscopic effect no matter which angle you view it from.
They're made from twenty circles of cardstock folded and fitted carefully together, then trimmed with glitter. You can use the same image for all the circles, or try different combinations like the one below, made with images of two vintage sewing badges.
The ones above feature our cats, past and present. An Internet search will turn up full instructions for making these geodesic ball ornaments.
Vintage Style Christmas Stocking
Posted 2018 Nov 2
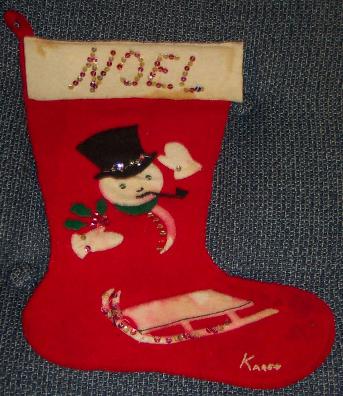
This Christmas stocking from 1954 is a family heirloom now, and it seemed only fitting that the grandchildren should have stockings with the same design -- updated, of course, for machine applique.
Click here to see the design re-imagined for a new generation of heirloom Christmas stockings.
Christmas Birthday Stocking
Posted 2018 Oct 26
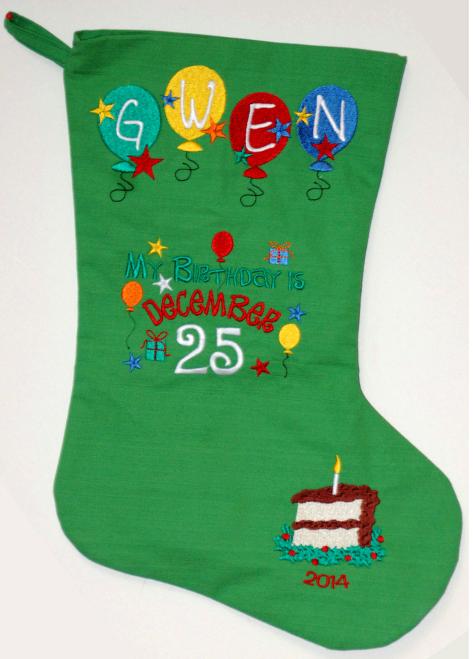
Although I made this stocking a few years back, it's still one of my favorites, and one I wish I had thought of years ago. It's perfect for someone who has a birthday over Christmas, when the celebration tends to be eclipsed by the larger holiday.
On this sock, I used the Balloon Alphabet to create her name, and the large size of the "My Birthday is December 25th" for the main image on the middle of the stocking. The toe is decorated with a piece of Christmas birthday cake.
This is quite a large stocking with room for both Christmas and birthday mementos; the design would work equally well for a Christmas Eve birthday too, using the "My Birthday is December 24th" design.
Click here to find the balloon alphabet free in 4" size.
Custom T-Shirts
Posted 2018 Oct 19
Each year I make customized tees for several of the guys on my list. The Harry Potter fan in the group will be sure to like his Hogwarts Alumnus shirt, while the blue tee with tilt-a-whirl applique will be a fun surprise for a fan of the classic circus ride.
Special-Interest Stockings
Posted 2018 Oct 12
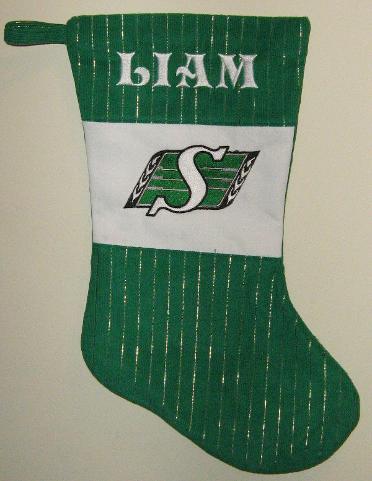
The definitive Christmas special when Shaun was a kid was A Charlie Brown Christmas, so I couldn't resist adding this embroidered Snoopy to his Peanuts-print Christmas stocking. For his name and other details I used a cartoon-style font. And I'm sure Liam was equally thrilled with his football stocking featuring the insignia of his favorite team. The plain insert panel in the middle gives a nice background for the embroidery, especially when the print is busy.
Embroidered Patches
Posted 2018 Oct 5
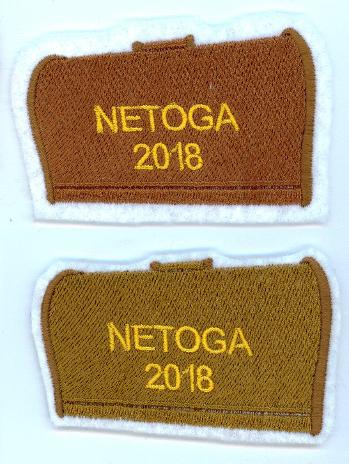
I made 15 of these patches for a friend who was attending a TOGA gathering in Bangor, ME. I'm told they were a hit with the attendies.
To make these mementos, I used the Domed Sewing Machine case design in 3" size (find it in the Vintage Sewing collection) and replaced the caption with the title and date. I stitched them on felt backed with two layers of medium-weight tear-away stabilizer, then trimmed the felt to a narrow border. They can be stitched to a garment or attached using fabric glue.
Large Teddy Bear
Soft toy design has been a hobby of mine for years; way back when, I even used to design toys for magazine features, and published two books of my toy designs.
I don't do as much of this kind of sewing as I used to, but I do like to keep in practice, and recently made this bear for a friend's first grandchild.
This bear stands about 30" tall and takes nearly two pounds of polyester stuffing. He's been customized with an embroidered heart showing the baby's name.
Re-Upholstered 50s Chair
I taught myself upholstery years ago so I could refurbish some of my garage-sale furniture. This Scandinavian chair, dating from the 1950s, was one of my earliest purchases back in the early 80s. It's most likely Danish, and although I'm not expert I believe the wood is teak.
I've re-done the upholstery several times over the years, including stripping the chair right back to the wood foundation and replacing the foam and padding.
I'm happy to report that its most recent incarnation seems to hold little interest for my cat, who shredded the previous fabric but hasn't touched this version so far. We're only a couple of weeks in, so it remains to be seen if my luck will hold.
Matchbox Ornaments
Each Christmas, I make new crafty ornaments for friends and family. Among this year's offerings are these nifty matchbox ornaments.
Each box in this collection was handmade with a printed tartan sleeve, and can be opened to reveal the memento inside -- in this case, a sign that reads "Cape Breton Christmas".
The embellishments on the outside of the boxes include these 1" tall freestanding lobster motifs, digitized and embroidered specifically for this purpose since I couldn't find any mini lobsters to fit the boxes. I also made the medallions.
Embroidered Ornament
I'm not much of a fan, but my best friend is crazy about the mouse, so she'll be hanging this one on her Christmas tree from now on.
Like the Looney Tunes ones higher on the page, this ornament is two-sided, with the same design on front and back, although if you like you can use a single embroidered design and leave the back of the ornament plain. Here's how I made it by stitching the embroidery design twice (once in reverse).
The silver bling was attached afterward with glue and hand-stitching, and I added a touch of iridescent glitter glue to give the stars and moon a bit of shine. The finished ornament is about 5" tall overall.
I've made several of this kind of ornament using a variety of designs -- they make great custom gifts.
The design is for a tomato pincushion. Find a PDF with full instructions at this link.
